Saturday, December 31, 2011

Doubly Cheesy Muffins and SNOW!!!! (I love snow)

It's the end of December!  I've been so busy!

I started a Cross Country Ski group and I've been busier than ever.  I love it so much!  I've been back on my skis for a few years and just wanted some folks to go with.  These are the kinds of skis for flat ground and small hills, and it's great.  The snow has nearly arrived 3 times already, and we've been busy getting classes going for waxing, ski specific exercise clinics, meet and greets, hikes to see the trails that will soon have snow, all sorts of stuff.  So fun!

Here's laurel Ridge State Park, a hike we just did of the ski trail.  Since the snow is still thin we hiked it.


I get so excited this time of year!  All winter, actually, I'm just SO excited!  People tell me I should move to Vermont.  And yes, they might be right!

In other news, the cold weather has lead to me being able to get both cats calm and in the SAME picture!  Look, it's happened twice already!


Wanna know what I made for the office holiday party?  You got it right!  Doubly Cheesy Muffins!  There were only 2 left at the end of the party, they were a big hit!

 So we preheat to 400 and start with the following ingredients:
Got that? 
Okay, okay, fine, I'll list them for you, too.  Sheesh.
Makes 18 Muffins.
4 Tbs Grits, 1/2 cup Water, 2 sticks butter, 1/2 tsp xanthan,  3 Tbs brown sugar,1 egg, 1.5 tsp baking powder, 15 oz container ricotta cheese, 1 cup instant tortilla/Masa flour (corn product, check that it's safe) 1 brick of cheddar cheese.

So we're getting started!
Cook the 4 Tbs Grits in 1/2 cup water, with the two sticks of butter in there.  Microwave 3 minutes in an oversized bowl.
AS SOON as it's done cooking, add and stir in 1/2 tsp Xanthan Gum power (the heat helps reconstitute the powder). 
Then add the 15oz container of Ricotta Cheese (helps if this is room temp) 1 egg,and 1.5 tsp of baking soda, and 3 Tbs brown sugar to the mixture.

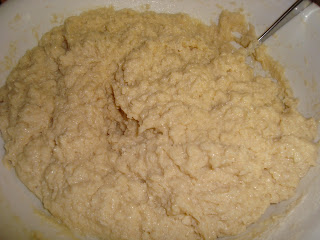
Stir all together to get basically this consistency:
Then gradually add the 1 cup instant tortilla/ Masa flour to get basically this consistency.  (Again, make sure this flour is safe for you, check that it does not contain any wheat ingredients and review all allergy statements.  Remember also that imports are not held to the same allergy statement rules as domestics, so be extra cautious there.)
That's pretty much it!  Spoon the mix into paper lined muffin molds.  (Mine are fancy, but that's just because I'm a silly person, regular old normal muffin tins are perfect, possibly even preferable.)  After you have the mix spooned in, just press one cube of cheddar into the center of each muffin (if the cheddar touches the paper it will be stuck to the paper after you cook it).
Bake at 400 for 30 minutes and you'll get 18 like this!
That's it, enjoy!!

Randal reminded me, he would like to send his Yuletide greetings via one green laser eye.
HAPPY NEW YEAR!!!

Sunday, December 4, 2011

Sweet Pumpkin Beef and such

I'm watching two wet cats groom, having bathed them both, unscathed, I am simply moistened.  And I'm listening to Celtic hour on our local radio station, Sunday at 7pm 91.3 WYEP Pittsburgh.  It's a nice Sunday evening.

A bit ago I made myself pumpkin beef, it was a wild idea that happened only because I had a little pie pumpkin that was going to start to go bad if I didn't use it fast.  I also had a roast.  I looked at the two things and thought WHY NOT!


So I've got one wet cat sitting in front of the computer screen a bit, so I keep looking around him.


And the other has decided the kitchen is a better place to groom.  He takes up more space, anyways, little tank that he is.


Well, Lytkin must have learned to read, he moved over to a spot less intrusive!  Nice timing!  Bath time went very well.  I used one of those 30 gallon plastic tubs with handles in the bathtub, it saved water since filling it to neck height is less water than the old cast iron tub I have, and also provided a place to set a wet cat and hold him while he finished dripping, since only part of the bathtub base was taken up by the plastic tub.  I'll definitely be doing it that way again.

So does pumpkin beef look good to you?  Oh, it was delicious.  And the seeds were an extra treat, too!  And easy, what more could you want?

Preheat oven to 425
Cut pie pumpkin in half, remove and reserve seeds.
Place halves cup-side up in a baking pan.
Put 1/4 cup brown sugar in each half.
Put beef roast across both pumpkin halves, balancing so the fats will drain onto the pumpkin.


Baking times for 2lbs roast.  This was a bottom round roast, but most any roaster will work well.
Bake at 425 for 20 minutes to brown.
Reduce heat to 300 and bake for additional 45 minutes for med-rare.

While baking, put skillet on low heat with generous olive oil, and put the seeds in.  Don't worry if some threads are in there, then end up crazy-delicious, that surprised me too!


Stir frequently, I believe this took 10 or 15 minutes, and they come out looking likes this.  I was going to wait and put it on my beef, but instead I ate them all right then because they were so delicious.


And when the beef's done, yum yum!


And my kitties are mostly dry!  Lytkin the prince is back in this throne, and Randal's a goober as always.


Tuesday, November 15, 2011

Breakfast grits for dinner

Well, while my facebook friends are offering up several potential captions on this picture of Randal...


I'm thinking yellow eggy grits are the best idea for dinner.  Because I'm feeling lazy.

EASY!
Prep one serving of grits as indicated on packaging
Add 2 tbs butter
Fry 2 eggs over-easy
Stir them into the grits so that the yolk colors the grits
If you really feel adventurous, you can chop up a strip of bacon and add that too.

It's southern.  It's not even my recipe.  A southern grama's grits... but that's not even my grama I'm talking about.  Somebody else's grama's grits.  They're amazing.

Here they are sans-bacon.  Because I don't have bacon right now.

Oh, I almost forgot, the southern grama also recommends small cheese cubes melted in.  Cheese makes me fat, so I only buy it when I feel like being spoiled.

Do you know a trick for getting a nice over-easy egg?  My trick involves instructions.  You'll need ample olive oil preheated in the skillet.  Set the heat a little higher than the lowest setting.  Slide the metal spatula all the way under the egg just when the bottom of the egg looks bubbly and solid white instead of translucent.  This last bit keeps the egg from bonding with the skillet, which is what makes it so hard to flip later.  As soon as it's flipped just cut the heat, the suddenly lower heat level there is nice to keep the inside of the egg yolk all nice and runny but still give the egg enough time to be able to deal with being lifted back off the skillet without breaking and leaking all over the place.  Here's the example.

And look, Lytkin is following in Randal's footsteps...
He's still young, give him time to work on it.  :)

Sunday, November 13, 2011

Sweet Chili (Vegan) (Halloween) (Rushed)

I am skipping the letter C today.  C is two deserts and nothing else.  And I'm not craving sugar right now, so I don't want to change that fact!  I guess now my alphabetical approach to my recipe backlog is jacked.  Oh well.

So pretty much every year for Samhain I go to my friend Anne's house for her gathering.  Anne is Vegan, and a darned good little cook with mad-good recipes and such.  She really spoiled us this year, so many Glutenless Goodies!!  Go check her out, really!  Love her!

Halloween colors were my inspirations for my Chili.  At the party I added a little label, and it was a big hit.   My label said: "Butternut Squash, Black Beans, Mushrooms, Sugar and Spice."  And that is your ingredient list, pretty darned easy.  It also made a killer dip for the sweet potato chips.


I think it kinda needed the label, though, because it's not a traditional looking food, people would have probably been confused.  Who needs traditional?  Yum yum yum yum yum!

So what happens when you plan out enough time, but then get out the bed-lifter broad fork in the garden and cause your back to seize up?  Well, after laying on heat for over an hour, stretching a lot, and poking my own pressure points, I took a lot more shortcuts than I wanted to so I could still show up on time.  Gotta watch those 40 pound, awkwardly shaped tools, seriously!

Start with one medium butternut squash (from my Uncle's garden), sliced lengthwise, de-seeded, with brown sugar in the seed hollow, cooked till tender.

  • Ideally this would have been in the oven.  45 minutes at 350.
  • With time limitations, microwaving it works.  In a large bowl with 1 inch water at the bottom and a bit of water in with the brown sugar.  15 minutes on high.
  • (This would also be really good with sweet potatoes instead of squash, by the way, with sugar added at the end instead.)
Black beans are something I just love.  I usually have them around in both dried and canned form.
  • Ideally, I would have simmered dried black beans for 40 minutes, draining twice.
  • With time limits, this was two cans of black beans well drained and rinsed.  
I was going to use the canned mushrooms anyways, one can sliced mushrooms, drained and rinsed, mixed with black beans, and microwaved for 3 minutes to get it nicely warmed up.  Ideally, this would have been added to the mostly-cooked beans just at the end, or fresh ones simmered in a skillet quickly.

In a large bowl, pour in the sugar liquid from the cups of the squash, scrape the flesh of the squash into the bowl, and mash this as you would potatoes.  Add bean and mushroom mix and stir in 1 tsp Cumin, and 1 tbs fresh ground coriander. 

Gardener's side track again. Coriander is from my garden, and is in a pepper grinder.  You don't have to grind it fresh if you don't have it that way, as long as it's ground rather than whole.  I recommend growing it very much, it's so easy and self seeds every year so you don't have to worry about it at all.  Once you throw seeds on the ground, you have it growing for good.

That's it.  It was really easy and a tasty hit even in it's hurried-up version!  

And my back is much better, too, of course.  I saw my Chiropractor on Halloween Monday and he fixed me up.  Yay!!

Oh, and THIS is a broadfork, by the way.  Once I'm able to operate it without harming myself it's going to be just about the most useful thing ever.

Friday, November 11, 2011

Banana Peppers Stuffed-up Easy


I'd like you to have to opportunity to laugh at the fact that I'm posting my blog backlog in alphabetical order!  How ridiculous am I?  I guess it has to be in some order, and that's a good enough order for me.  You'll see, this is a little while ago.

Look how well my hot banana peppers did this year!!

Garden dork side-track time!  They are growing over a salvaged bamboo coffee table, which turns out to be a perfect support for peppers, and at the base I've embedded a bottomless juice bottle in the ground, lid off, with the top in the ground. This allows me to water the peppers by simply filling the juice jug with water and it doesn't run off, it all goes straight to the roots where it's needed.  This system has done wonderfully.  End tangent.

While I was harvesting, I simmered up some ground beef and pre-cooked rice (I cook brown rice each week and put it in the fridge for myself), but you could cook down some rice in the pan, then add the ground beef when the rice is ready.  I also added some cumin, it's my favorite.


Picking nice straight peppers, I cut and cored them.  A slice across the cap that doesn't sever the rear wall, and a zipper slit down the top does the trick, then reach in and pull out however much of the seed structure you can reach.


Stuff the peppers from near the top of the pepper then use a spoon to slide it down towards the smaller tip.  Okay, watch this short video to see what I mean.  10 second video saves about 95 characters in explaining, haha.  And yes, the video is pretty crappy, whatever.


And bake-em.  It was at 350, and aw dang, how long?  I think this was about 20 minutes.  Yes, that is what I think.  Please keep an eye on 'em, ok?

They'll look lovely when they're done.  Yay!!


Enjoy, they're freaking killer delicious.

Thursday, November 10, 2011

Banana Squishers and a kitty

Hi everybody!  I have very interesting news!  Very interesting news indeed.

On Tuesday October 18th, sadly, my little canary buddy passed away.  The best I can figure, he possibly suffered a stroke that slowly took hold over 3 days, he just kept getting more clumbsy on his right side.

So that night I burried him, candles lit, a little ceremony for 'soul release' which is something I do for everything I love that passes on, human or otherwise.  My canary was in a mason jar for a coffin, layed in Sage and Rue branches, and I was meditating on what I would want to tell him to send his soul on to the afterworld.  It was coming to peace when...

A little cat that looks almost exactly like my Little-one who died in April comes meowing up into the yard wanting love and cuddles.  I think Little (the cat) and Widly (the canary) coroborated in spirit to bring me a friend!  How could I turn him away!  I've named him Lytkin.

Look at the resemblance!

I have to get him checked out.  I pulled three ticks off him, gave him frontline, fed enough that he isn't so boney anymore, he does need fixed.  He clearly used to have humans, he knows the ropes, even knows what a can opener is, and sleeps through me scratching his head, he's very domestic.  People dump animals up here because of the wooded hillside.  That's my guess.  There is trouble in paradise, I think he has a hernia.  I'm going to get him all checked out soon.  ARL has the inexpensive spay program, and whenever I took Randal in they yoinked his bad tooth while he was sedated for the snip-snip and it didn't cost me any extra.  A hernia is a lot more complicated, though.  I really don't know if it will be ok, but at least I can keep him healthy and happy longer than he would have been living out in the wild.

So the two kids are getting on just fine now.  Randal likes to be the big boss, and sometimes pummels him a bit, but they're working it out.

So I have a fun snack idea for you.

Banana Squishers!!

Step 1: slice bananas.
Step 2: put your favorite nut butter on half the slices
Step 3: squish the peanut butter with another banana slice

SO EASY!  Kids like them, they're fun, a little messy, and even healthy!  Here I used Almond butter.  Peanut butter or whatever is also awesome.

And for Halloween I put Reeses Pieces on them like they had eyeballs.  The kids at that party really loved them.  These were made with peanut butter.

So do you want to see more pictures of the kitty?  Would that be something lovely?  Well, I'm not sure what your answer is, but here's more pictures of the new kitty anyways.

Look at the tummy stripes!

And bright beautiful eyes 
 (After a few days of good food, tick removal and de-worming, boy he got bigger pretty fast, he had some growing to catch up on, apparently, and his eyes got a lot brighter, he's so much happier and healthier, it didn't take much even, just some love and some bug removal.)

Look at his sweet sleepy head

Wondering what the heck a camera is...

Crashed out in my lap, so tired.

A little more curious about the camera now.

Yes, this is Lytkin.  Randal's going to have to share the spotlight.  :)

Tuesday, October 18, 2011

Floooorrrr!!!! Floor! Floor!

At long last, I have great news about my floor!  I want to show you the completed product, and ALSO show you how much danged work this was!!

Here's a floor!  Captions by Randal.
Sriusly, uuu did dis??? 
Wayt, I nos dat, I see'd u do dis.
I lik dis flur!
Sliipn on dis flur is awsm.  Zzzzz.
~~~~~~~~~~~~~
So that cat approves.  I am very happy, very happy!  It was a ton of work, and very much worth it.  Here's how this all went along.
It started with pulling up some carpet that seemingly was from the 70s, ew. I took the risk of finding what might be underneath.

And finding lanolium edges to pull up, and paint and varnish under that, but only on the edges, the center area was completely raw wood and quite discolored.  (I found out the reason for this is that before there was wall-to-wall carpet, they'd just tack an area rug in the center of the room and finish only the edges).  I'm super lucky that nothing was glued down.

And commense the sanding.


And Heat gun stripping of the edges where all that varnish was.  I think I saw 6 layers of various types of coatings.
But do you see the color difference between where there was varnish and where there wasn't?
So I tried bleaching the center area on advice from a website.
And plugged the worst holes from a knot that had fallen out and pipes from the old radiators.
   
But when I started sanding again with the fine grain paper to put the final smooth sheen on the wood, the color difference was still under there.  So the bleaching was a waste.
So I completed the finishing smooth sanding and cleaned up with the shop vac and teeshirt rags, sometimes the rags were used creatively such as tied around the broom to wipe the walls and ceilings down.  Sawdust is still throughout my house, I've been getting around to dusting every surface in the house, even the cans in the pantry were covered.
So, in this picture I'm not quite done with staining my first coat, having painted myself out of the house.  I started with just natural stain all over the floor, but I found that it really accented the color difference between the center and edges. You can see the bits on the left and nearest the door are quite dramatically a different color than the bit you can see farther in the room.  The few boards in that swath in the center aren't stained yet at all.
So I got cherry color stain and put that just on the edges to darken them to make them match better.
And proceeded to erect an "exterior stairwell" as I called it for the next few days.  I figured that with locked windows, the ladder didn't effect security any more than having windows on a first floor does when they're locked.
Here it is with the color touch up and the first coat of polyeurethane on. Shiney! 
After all the staining, it was time to install new baseboards (which incedentally, I keep calling them floorboards, and I know it's wrong but I just keep saying that!)

It took my dad and I and dad's miter saw 7 hours of straight hard labor to get the baseboards all installed.
And finally I could start moving in!

And here is my vblog of the completed floor.  :)  There's another vblog about how strongly this project effected the rest of my life, but I'm not ready to post that one.  Not at all.
And "Floor" is a wonderful interjection, by the way.  Better than any curse word.  It tends to evoke confusion in passers by, and indeed in anyone who is not in-the-know.  One friend became so facinated by my floor project, he renamed me Flora.  I think this is PERFECT, and if I ever am in need of a pen name, Flora will be the ticket!  Yaaaaay, I have a floor!  And I've had several dinners at the table, it is no longer novel having a table at which to eat.  Thank god for that.